How to Install Lithium Golf Cart Batteries on a 36V or 48V Golf Cart
January 30, 2022 | Sales Team
This blog is for replacing your batteries, if you need assistance choosing the right battery, or if you have questions about lithium batteries, please refer to What Battery Do I need for My Golf Golf Cart?
Preparing to Remove Your Batteries:
The only hardware tool you need to replace your batteries is a ratchet or a socket wrench set. If you are taking out lead acid batteries, make sure to wear goggles and gloves (to protect against the acid and corrosion), and you may need battery carrying straps due to their weight. If you are using a 12V converter, you may need a stripping and connection kit for the wires. Before you start, it is a good idea to take a picture of your setup, and sketch a wiring diagram to help you keep track of all your connections. If you have this setting, change your vehicle from run to tow. With the vehicle off and the charger unplugged, you are ready to remove your batteries.

ATTENTION:
When wiring DL+ batteries in series, the use of a fuse is strongly encouraged for safety, unless it has been confirmed that the equipment being powered will never exceed the batteries’ operating parameters. We recommend installing the fuse between the battery positive and the main positive.
Removing Old Batteries:
First, disconnect your main negative cable, then your main positive cable. The main cables are the ones with the wire going out of the battery that don’t connect to the other batteries. Then remove the remaining cables before taking out the batteries. After removing your batteries you can clean the battery bay, if needed, with a baking soda and water solution to remove any battery acid.
Connecting Batteries In Series:
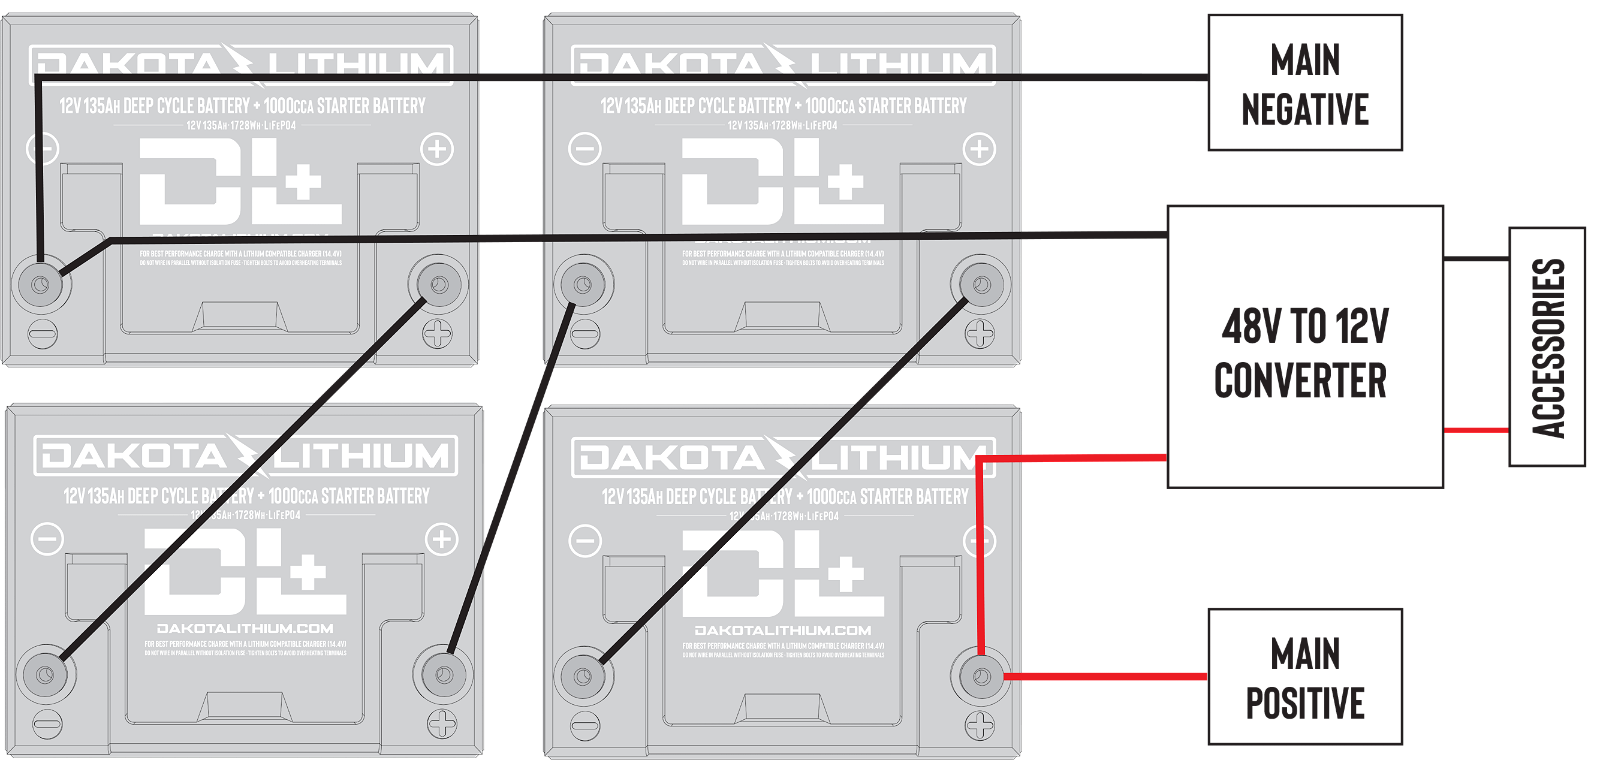
Make sure your batteries are fully charged before connecting them in series. All Dakota Lithium packs with 50Ah or higher batteries include a 12V charger for balancing. For Important information regarding the best balancing practices click here. For more information on how to connect your batteries in series click here. You can use our Golf Cart Connection Kit, or other high amp rated 4 AWG gauge wiring.
Installing Your Batteries:
When you have your batteries secure in the cart and wired together, You can connect the main cables, starting with the positive All connections should be torqued to 10 foot-pounds. After connecting your batteries to the cart, you are good to go! Test out your cart before packing up, double check all your connections, and after ensuring they’re secure apply some dielectric grease to your battery terminals to keep them protected from the elements.
Connecting 12V Accessories:
If you have a 12V lighting or accessory connection, you need a 36/48v to 12v converter to keep the battery pack in balance.
Monitoring Your Batteries:
The strong discharge curve of a LiFePO4 battery keeps it at a higher voltage until the battery is almost depleted. Meters that are designed for lead acid batteries will not give you an accurate reading. Over time you will get a sense of your run time on your specific cart, but for a more accurate solution, we recommend one of these Victron LiFePO4 compatible monitoring solutions: Victron Energy BMV-712 Smart Battery Monitor with Bluetooth, or Victron Smart Shunt 500A/50mV Bluetooth Battery Monitor.
Caring For Your Battery:
To get the longest lifespan out of your battery, discharge your battery as much as you can before recharging them. Make sure the temperature is always above freezing when charging, and only use your Dakota Lithium charger. Remember your batteries are water resistant, but not waterproof. Make sure you treat them like an electronic device to get the most out of your battery.
If you have any questions, you can reach support at support@dakotalithium.com